# Quick Start {#quick-start}
To connect Aigon to your LLM you need to add an MCP server to it. As an example we show here how to connect Aigon to Claude ([details](#mcp-for-claude)):
1. Type and send the [/weblogin](https://wa.me/447477156095?text=%2Fweblogin) (short [/wl](https://wa.me/447477156095?text=%2Fwl)) command in WhatsApp to get a login link for your browser
2. Open the login link in your main browser (copy and paste if need be), then click on the orange login button to log into Aigon ([details](#login-links))
3. In your main browser, go to [claude.ai](https://claude.ai), log into Claude if need be, and add in [settings](https://claude.ai/new#settings/customize-connectors) add the Aigon MCP server `mcp.aigon.ai/sse` as `aigon-prod` to your Claude workspace ([details](#mcp-for-claude)).
4. The server will open an approval page on [a1.aigon.ai](https://a1.aigon.ai) where you will be asked to approve the connection. Click **Approve** and **Redirect** to complete the connection.
5. You may also have to allow the domains `mcp.aigon.ai` and `a1.aigon.ai` in Claude's [**Capabilities** tab](https://claude.ai/new#settings/capabilities) if you are using Cowork ([details](#domain-allowlist)).
6. In Claude, ask it to explore the Aigon MCP server
For other LLMs, the steps are similar, provided they support MCP, or they are able to call a REST API ([details](#connection-types)). Point them to [the page you are currently reading](https://aigon.ai/docs/connecting-mcp/) and have them explain to you how to best connect.
---
# Logging into Aigon {#logging-into-aigon}
## Login links {#login-links}
If you want to use OAuth authentication your first have to log your browser into the aigon website at `a1.aigon.ai`. In most cases, the easiest way to do so is to log in using a login link that you generate using the [/weblogin](https://wa.me/447477156095?text=%2Fweblogin) or [/wl](https://wa.me/447477156095?text=%2Fwl) command.
The login link works in a two step process, first opening a page that says _"Please click here to login"_ and you are only logged in once you click the button. The reason for this is that it allows you to transfer the login links, that can only be used once, to another browser or device. For example
- If you want to log in on a desktop computer, send [/wl](https://wa.me/447477156095?text=%2Fwl) to Aigon using the WhatsApp app, click the login link in the browser that opens, and your are logged in that browser
- If the login link opens in Chrome and you want to log in Safari then simply copy the login link from Chrome into Safari, and click Login there
- If you do not have WhatsApp on your computer, you can generate the login link in WhatsApp and then move it over to the computer, eg using the Apple Airdrop feature, or by emailing it to yourself (this is safe because links can only be used once)
- If you are in WhatApp on the iPhone the link may open in the app browser and you will not usually want to login there; instead click the Safari symbol on the app browser, the link opens in Safari, and you click it there
## QR code {#qr-code}
There is a second method for logging into devices which is useful if you cannot get a link to them directly. Simply open
> [a1.aigon.ai](https://a1.aigon.ai)
and scan the QR code that appear on this page on your phone. Provided you are logged into Aigon on your phone it will lead you to an approval page that will allow you to log into the computer without needing a login link.
## Bearer token {#bearer-token}
If your LLM cannot do OAuth, a bearer token is the fallback — see [Bearer token](#bearer-token-detail) in the Appendix.
# MCP for Claude {#mcp-for-claude}
You can in principle add MCP servers locally, but this is not recommended.
Firstly it means they are only available on the computer where they have been
added, and secondly they need to reauthenticate every time the MCP server is
restarted — which happens quite often, because it is under active development.
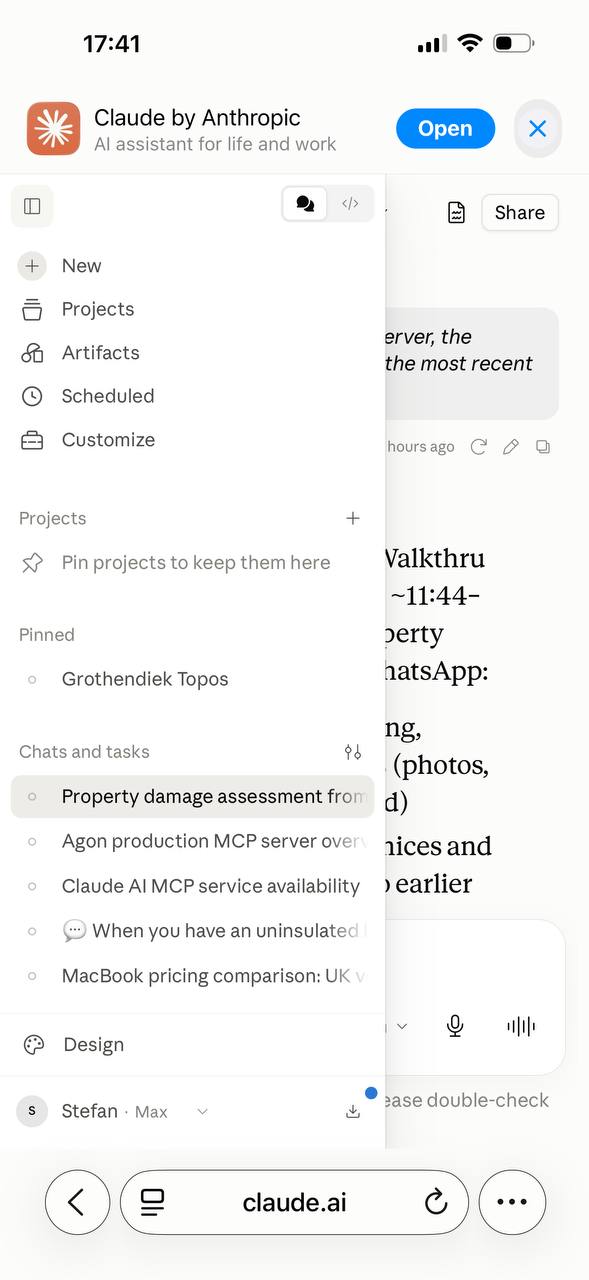
Instead we recommend installing the MCP server in claude.ai directly. First log
into your normal [claude.ai](https://claude.ai) workspace and find the
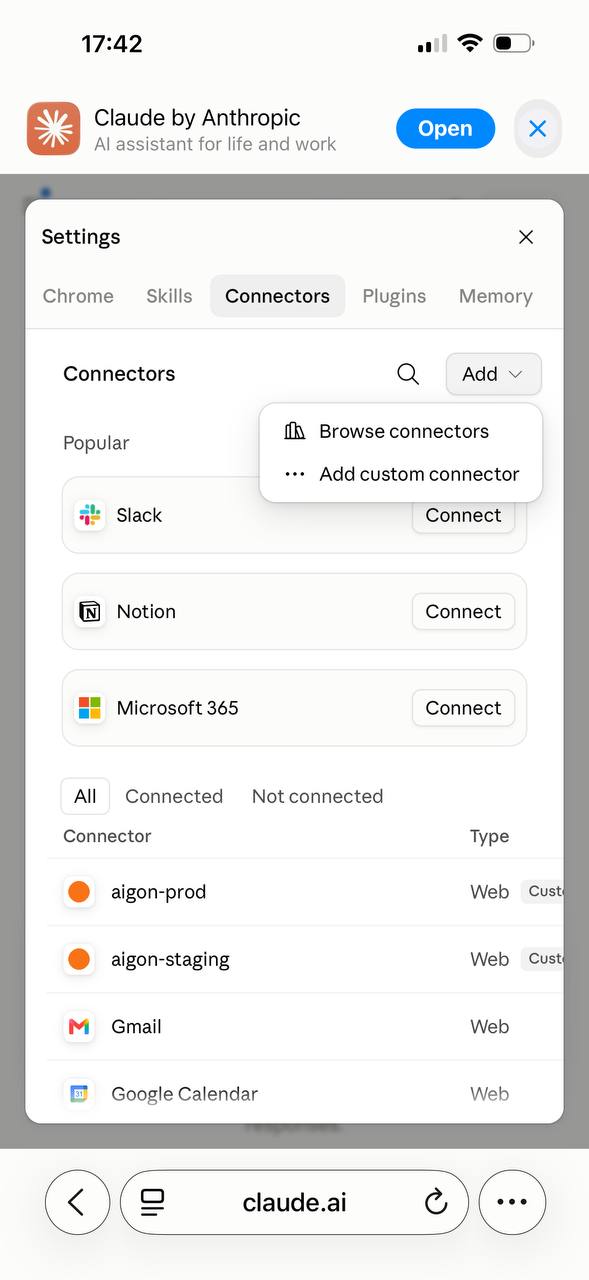
**Customize** menu point. When you click there you need to find the
[**Connectors** tab](https://claude.ai/new#settings/customize-connectors), then **Add** followed by **Custom connector**.
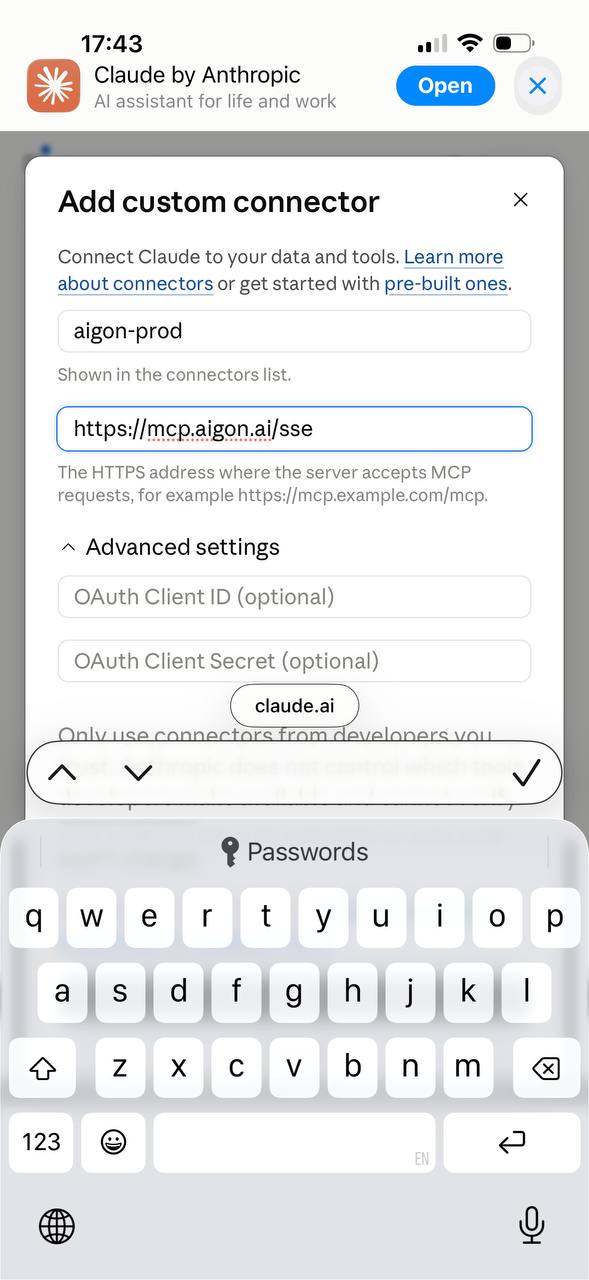
Fill in a name and the server address:
> aigon-prod / https://mcp.aigon.ai/sse
Leave the OAuth client ID and secret under **Advanced settings** empty — they
are optional and Aigon does not need them.
When you click **Add** it will offer to **connect**. When you click that, the
OAuth flow on `a1.aigon.ai` opens, provided you have previously
[logged in](#logging-into-aigon). Click **Approve** and **Redirect**, and the
connection is established.
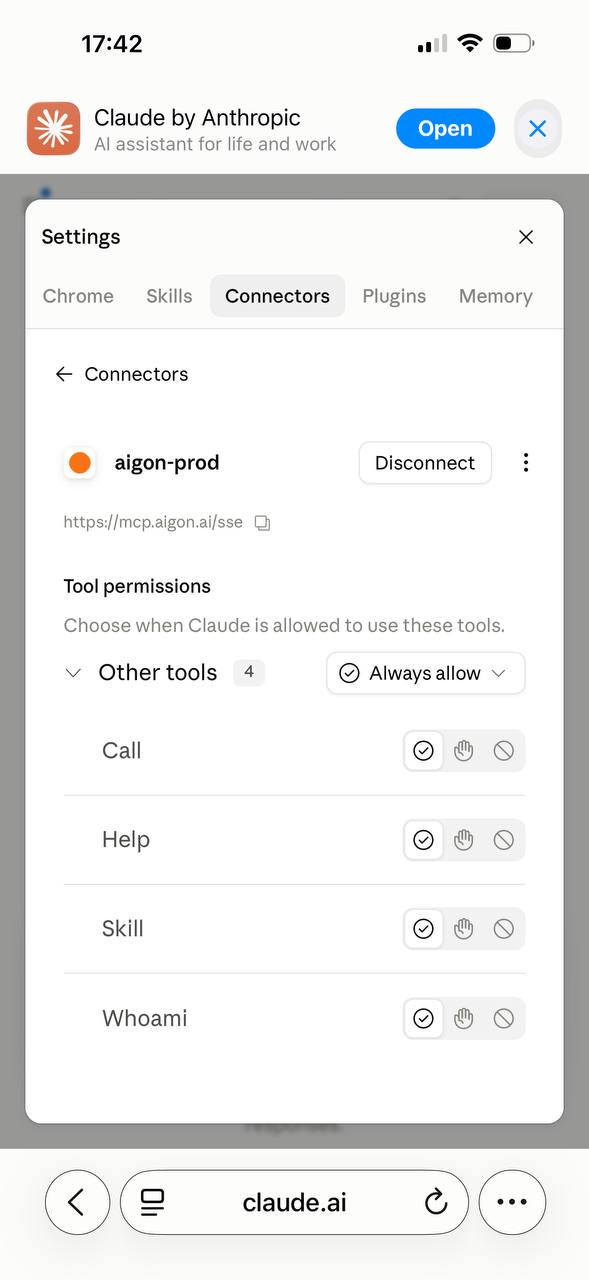
Once connected you will see the server's tool permissions — **Call**, **Help**
and **Skill**, plus **Whoami**. Those first three are the whole API; see the
[CaSH model](#cash-model) below. Setting them to *Always allow* saves being
asked on every call.
# MCP for Cowork {#mcp-for-cowork}
**Cowork** is a separate surface inside the same Claude account, with its own
tab in **Settings**. It shares the account's connectors: an Aigon connector
added under [MCP for Claude](#mcp-for-claude) is the same connector here and
does not need adding a second time.
What it does not share is the assumption that the network is open. Cowork works
in a **sandbox**, and the sandbox reaches only the domains on its allowlist.
## Domain allowlist {#domain-allowlist}
If Claude refuses the connection, or reports that it cannot reach
`mcp.aigon.ai`, this is almost always the reason. Open **Settings** and select
the **Capabilities** tab:
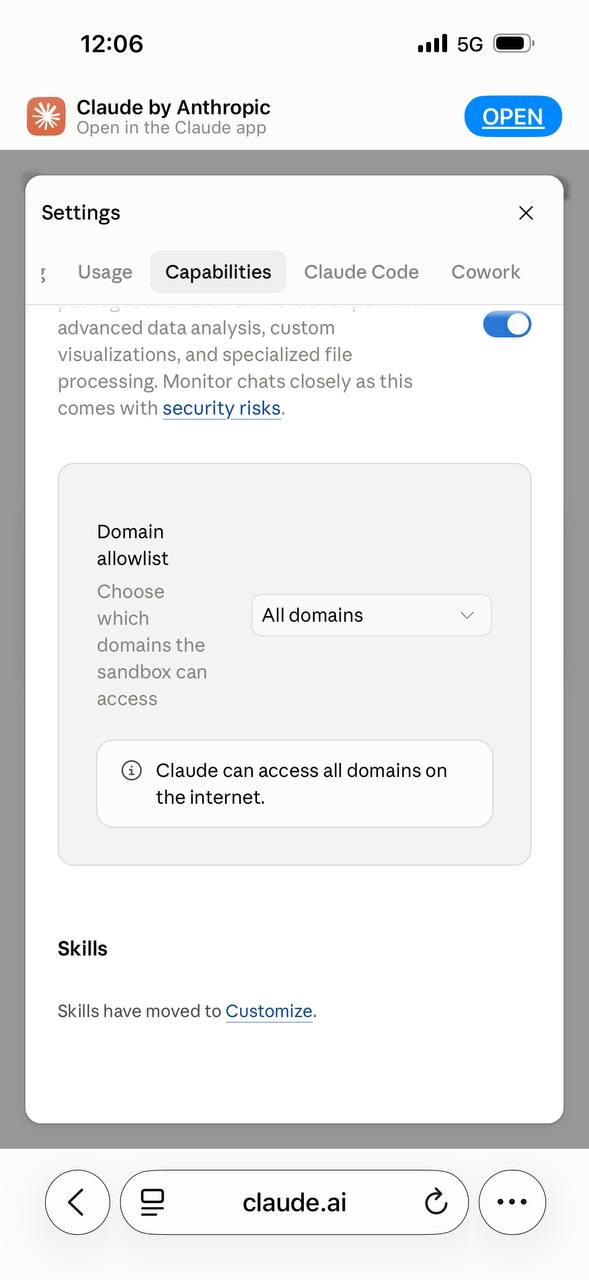 The setting shown there is **All domains** - *"Claude can access all domains on
the internet"* - and with that every Aigon access point is reachable. If yours
is narrowed to a specific list instead, add
> mcp.aigon.ai
to it, and `a1.aigon.ai` as well if you want the OAuth flow to complete inside
the sandbox rather than in your ordinary browser.
Note the trade-off the same screen warns about. The capability that makes the
sandbox useful - code execution, file processing - is also what makes an open
allowlist worth a second thought: a sandbox that can reach every domain can
carry your data to every domain. Allowlisting the two Aigon hosts and nothing
else is the tighter setting, and it is enough for everything in this guide.
The allowlist governs the **sandbox**, not the connector. [MCP CURL](#mcp-curl)
runs inside the sandbox and is therefore subject to it; a connector added under
**Customize -> Connectors** is brokered by Claude itself and is not.
# MCP for ChatGPT {#mcp-for-chatgpt}
ChatGPT only allows connecting MCP servers on the expensive **Pro**
subscription and above — and even there only with read and fetch permissions.
Full MCP support, which includes actions that write, is limited to Business,
Enterprise and Edu workspaces. There is no MCP on Plus, and none on the free
tier.
On Pro you enable **Developer mode** in ChatGPT on the web, under
**Settings → Apps → Advanced settings**; on accounts still showing the older
naming the same toggle is at **Settings → Connectors → Advanced**. OpenAI's own
instructions are in
[Developer mode and MCP apps in ChatGPT](https://help.openai.com/en/articles/12584461-developer-mode-and-mcp-apps-in-chatgpt).
Then add a custom connector pointing at one of the [access points](#quick-start)
above, and authenticate either with OAuth or with a
[bearer token](#bearer-token).
Because Pro is read-and-fetch only, an Aigon connector there will read and
search your notes but will not be able to write to them. If you want the full
surface without a Business workspace, the [REST access point](#mcp-curl) is the
way round it.
# MCP CURL {#mcp-curl}
Any LLM that has code execution capabilities can use the MCP REST API
directly. In principle this API also allows for OAuth login, but in practice
the LLM may not be able to execute the flow, so you may need to generate and
use a [bearer token](#bearer-token). You can point your LLM to
> [mcp.aigon.ai/rest/openapi.json](https://mcp.aigon.ai/rest/docs)
for reading the API specifications — that is the machine-readable OpenAPI
document.
In principle you can give it the bearer token directly, but this is not
recommended because it will end up in its context, which is transmitted to
your model provider. Instead, create a shell file `secrets.sh` that contains
export AIGON_BEARER_TOKEN=agatcf_74e403f441558f14b025288549f462
and tell your LLM to source it from there without looking at it. It can then
use the variable without the value ever passing through its context:
source secrets.sh
curl -s -H "Authorization: Bearer $AIGON_BEARER_TOKEN" \
https://mcp.aigon.ai/rest/whoami
Keep `secrets.sh` outside anything the LLM might read wholesale or commit — a
token in a repository is a token in everyone's context.
# Appendix {#appendix}
## Bearer token {#bearer-token-detail}
If you for some reason cannot authenticate via OAuth, for example because your LLM does not allow it, you can also create a bearer token that allows your LLM to access your account. **Note however that this token is highly sensitive: everyone with this token has full access to your Aigon account so take the appropriate care when using it, and revoke it when it is no longer needed.**
There is a single bearer token for your account that you can create using
> [/auth reset yes](https://wa.me/447477156095?text=%2Fauth%20reset%20yes)
The output will be something like
API Token Generated
• Token: agatcf_74e403f441558f14b025288549f462
• Generated: 2026-08-25 17:08 UTC
and the token is the string starting with `agat...`. You can clear your token using
> [/auth clear yes](https://wa.me/447477156095?text=%2Fauth%20clear%20yes)
which irrevocably removes this token. You need to create a new one using [/auth reset yes](https://wa.me/447477156095?text=%2Fauth%20reset%20yes) and communicate it to your LLM in an appropriate manner.
The token is used in the standard manner, as an HTTP `Authorization` header
on every request:
Authorization: Bearer agatcf_74e403f441558f14b025288549f462
That one header is all there is to it. It works the same way on all three
access points, and the same slot accepts either credential — an OAuth access
token or this API token — so a client that already speaks OAuth needs no
special handling. A request without a usable token is answered with `401`.
Most MCP clients have a field for a custom header when you add a server by
URL; that is where this goes. For the REST access point you can equally pass
it with `curl -H`.
## No backwards compatibility {#no-backwards-compatibility}
This API is designed for consumption with LLMs and just-in-time discovery, and it is subject to change without notice. Therefore do not write integrations that assume a certain input and output format as they will invariably break. Instead have the API interaction intermediated with an LLM and have it write ad-hoc code if needed.
## Connection types {#connection-types}
There are three access points for the Aigon MCP servers, using slightly different protocols. They are mostly interchangeable, but MCP technology is relatively recent, and different LLMs have different preference. Our suggestion is to try the three protocols in the order provided
- **SSE**: [mcp.aigon.ai/sse](https://mcp.aigon.ai/health)
- **HTTP**: [mcp.aigon.ai/mcp](https://mcp.aigon.ai/health)
- **REST**: [mcp.aigon.ai/rest](https://mcp.aigon.ai/rest/docs)
(you may or may not have to add a `\` at the end of the path, depending on your system). They all support logging in with OAuth against `a1.aigon.ai`, as well as [bearer token authentication](#bearer-token). We recommend always using OAuth and the bearer token fallback only if OAuth is not an option. For using OAuth, use the [/weblogin](https://wa.me/447477156095?text=%2Fweblogin) or [/wl](https://wa.me/447477156095?text=%2Fwl) command in WhatsApp to get a login link into `a1.aigon.ai`.
**SSE** and **HTTP** are the two MCP transports. Both speak the MCP protocol
proper and expose the same functions; which one to use is purely a question of
what your client supports. We recommend to use SSE if it is available.
What we call **REST** is an API that is semantically equivalent to
the MCP server, so it is not technically following REST standards. Like a REST API it is operated with ordinary POST and GET / QUERY requests, so anything that can make an
HTTP call can use it without speaking MCP at all. It carries its own OpenAPI
description at [mcp.aigon.ai/rest/docs](https://mcp.aigon.ai/rest/docs).
## CaSH model {#cash-model}
The Aigon MCP design follows the [CaSH specifications](https://aigon.ai/blog/2026-04-23-mcp-cash-model/), which is optimised about progressive discovery and therefore extremely context-efficient. The core of the CaSH model is three functions only
- **Call** encapsulates all bona-fide MCP calls
- **Help** provides the help for the call functions, and is 1:1
- **Skill** provides cross-functional skills how to get stuff done
Normally an LLM would be able to figure this out for themselves, but if they are stuck, ask them to look through the skills wether there is some information about how to solve a specific task. If you find there is not, please [contact us](/contact/) and we'll gladly add it to our skills library.
The setting shown there is **All domains** - *"Claude can access all domains on
the internet"* - and with that every Aigon access point is reachable. If yours
is narrowed to a specific list instead, add
> mcp.aigon.ai
to it, and `a1.aigon.ai` as well if you want the OAuth flow to complete inside
the sandbox rather than in your ordinary browser.
Note the trade-off the same screen warns about. The capability that makes the
sandbox useful - code execution, file processing - is also what makes an open
allowlist worth a second thought: a sandbox that can reach every domain can
carry your data to every domain. Allowlisting the two Aigon hosts and nothing
else is the tighter setting, and it is enough for everything in this guide.
The allowlist governs the **sandbox**, not the connector. [MCP CURL](#mcp-curl)
runs inside the sandbox and is therefore subject to it; a connector added under
**Customize -> Connectors** is brokered by Claude itself and is not.
# MCP for ChatGPT {#mcp-for-chatgpt}
ChatGPT only allows connecting MCP servers on the expensive **Pro**
subscription and above — and even there only with read and fetch permissions.
Full MCP support, which includes actions that write, is limited to Business,
Enterprise and Edu workspaces. There is no MCP on Plus, and none on the free
tier.
On Pro you enable **Developer mode** in ChatGPT on the web, under
**Settings → Apps → Advanced settings**; on accounts still showing the older
naming the same toggle is at **Settings → Connectors → Advanced**. OpenAI's own
instructions are in
[Developer mode and MCP apps in ChatGPT](https://help.openai.com/en/articles/12584461-developer-mode-and-mcp-apps-in-chatgpt).
Then add a custom connector pointing at one of the [access points](#quick-start)
above, and authenticate either with OAuth or with a
[bearer token](#bearer-token).
Because Pro is read-and-fetch only, an Aigon connector there will read and
search your notes but will not be able to write to them. If you want the full
surface without a Business workspace, the [REST access point](#mcp-curl) is the
way round it.
# MCP CURL {#mcp-curl}
Any LLM that has code execution capabilities can use the MCP REST API
directly. In principle this API also allows for OAuth login, but in practice
the LLM may not be able to execute the flow, so you may need to generate and
use a [bearer token](#bearer-token). You can point your LLM to
> [mcp.aigon.ai/rest/openapi.json](https://mcp.aigon.ai/rest/docs)
for reading the API specifications — that is the machine-readable OpenAPI
document.
In principle you can give it the bearer token directly, but this is not
recommended because it will end up in its context, which is transmitted to
your model provider. Instead, create a shell file `secrets.sh` that contains
export AIGON_BEARER_TOKEN=agatcf_74e403f441558f14b025288549f462
and tell your LLM to source it from there without looking at it. It can then
use the variable without the value ever passing through its context:
source secrets.sh
curl -s -H "Authorization: Bearer $AIGON_BEARER_TOKEN" \
https://mcp.aigon.ai/rest/whoami
Keep `secrets.sh` outside anything the LLM might read wholesale or commit — a
token in a repository is a token in everyone's context.
# Appendix {#appendix}
## Bearer token {#bearer-token-detail}
If you for some reason cannot authenticate via OAuth, for example because your LLM does not allow it, you can also create a bearer token that allows your LLM to access your account. **Note however that this token is highly sensitive: everyone with this token has full access to your Aigon account so take the appropriate care when using it, and revoke it when it is no longer needed.**
There is a single bearer token for your account that you can create using
> [/auth reset yes](https://wa.me/447477156095?text=%2Fauth%20reset%20yes)
The output will be something like
API Token Generated
• Token: agatcf_74e403f441558f14b025288549f462
• Generated: 2026-08-25 17:08 UTC
and the token is the string starting with `agat...`. You can clear your token using
> [/auth clear yes](https://wa.me/447477156095?text=%2Fauth%20clear%20yes)
which irrevocably removes this token. You need to create a new one using [/auth reset yes](https://wa.me/447477156095?text=%2Fauth%20reset%20yes) and communicate it to your LLM in an appropriate manner.
The token is used in the standard manner, as an HTTP `Authorization` header
on every request:
Authorization: Bearer agatcf_74e403f441558f14b025288549f462
That one header is all there is to it. It works the same way on all three
access points, and the same slot accepts either credential — an OAuth access
token or this API token — so a client that already speaks OAuth needs no
special handling. A request without a usable token is answered with `401`.
Most MCP clients have a field for a custom header when you add a server by
URL; that is where this goes. For the REST access point you can equally pass
it with `curl -H`.
## No backwards compatibility {#no-backwards-compatibility}
This API is designed for consumption with LLMs and just-in-time discovery, and it is subject to change without notice. Therefore do not write integrations that assume a certain input and output format as they will invariably break. Instead have the API interaction intermediated with an LLM and have it write ad-hoc code if needed.
## Connection types {#connection-types}
There are three access points for the Aigon MCP servers, using slightly different protocols. They are mostly interchangeable, but MCP technology is relatively recent, and different LLMs have different preference. Our suggestion is to try the three protocols in the order provided
- **SSE**: [mcp.aigon.ai/sse](https://mcp.aigon.ai/health)
- **HTTP**: [mcp.aigon.ai/mcp](https://mcp.aigon.ai/health)
- **REST**: [mcp.aigon.ai/rest](https://mcp.aigon.ai/rest/docs)
(you may or may not have to add a `\` at the end of the path, depending on your system). They all support logging in with OAuth against `a1.aigon.ai`, as well as [bearer token authentication](#bearer-token). We recommend always using OAuth and the bearer token fallback only if OAuth is not an option. For using OAuth, use the [/weblogin](https://wa.me/447477156095?text=%2Fweblogin) or [/wl](https://wa.me/447477156095?text=%2Fwl) command in WhatsApp to get a login link into `a1.aigon.ai`.
**SSE** and **HTTP** are the two MCP transports. Both speak the MCP protocol
proper and expose the same functions; which one to use is purely a question of
what your client supports. We recommend to use SSE if it is available.
What we call **REST** is an API that is semantically equivalent to
the MCP server, so it is not technically following REST standards. Like a REST API it is operated with ordinary POST and GET / QUERY requests, so anything that can make an
HTTP call can use it without speaking MCP at all. It carries its own OpenAPI
description at [mcp.aigon.ai/rest/docs](https://mcp.aigon.ai/rest/docs).
## CaSH model {#cash-model}
The Aigon MCP design follows the [CaSH specifications](https://aigon.ai/blog/2026-04-23-mcp-cash-model/), which is optimised about progressive discovery and therefore extremely context-efficient. The core of the CaSH model is three functions only
- **Call** encapsulates all bona-fide MCP calls
- **Help** provides the help for the call functions, and is 1:1
- **Skill** provides cross-functional skills how to get stuff done
Normally an LLM would be able to figure this out for themselves, but if they are stuck, ask them to look through the skills wether there is some information about how to solve a specific task. If you find there is not, please [contact us](/contact/) and we'll gladly add it to our skills library.